Yoga is a fantastic way to improve flexibility, reduce stress, and build strength, especially for beginners looking to start their practice at home. If you’re new to yoga, you might feel overwhelmed by complex poses or studio classes, but the good news is that beginners yoga poses for beginners at home are simple, accessible, and require minimal equipment. This article will guide you through simple yoga poses that are perfect for starting your yoga journey in the comfort of your own space.
Why Start Yoga at Home?
Practicing yoga at home allows beginners to move at their own pace, explore poses without judgment, and create a routine that fits their schedule. All you need is a comfortable space, a yoga mat (or a soft surface), and a willingness to try. The following yoga poses for beginners are designed to be gentle, promote relaxation, and build a foundation for your practice.
5 Simple Yoga Poses for Beginners
Below, we’ll dive into five simple yoga poses that are ideal for beginners. Each pose includes detailed instructions, benefits, and tips to ensure proper alignment and safety.
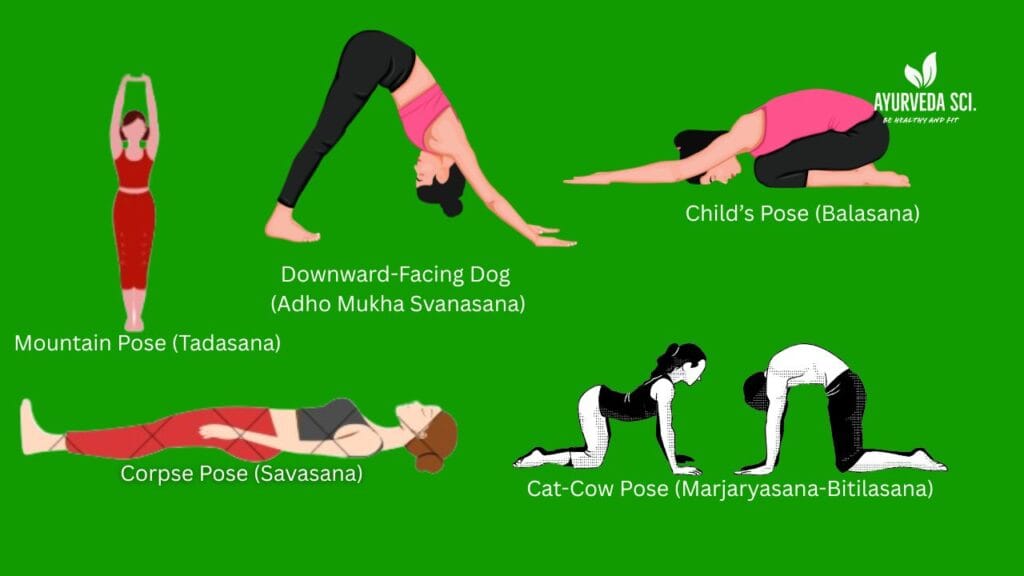
1. Mountain Pose (Tadasana)
Overview: Mountain Pose is the foundation of many standing poses and helps improve posture and balance. It’s a great starting point for beginners yoga poses for beginners at home.
How to Do It:
- Stand with your feet together or hip-width apart, toes pointing forward.
- Engage your thighs, lift your chest, and roll your shoulders back and down.
- Extend your arms alongside your body, palms facing forward.
- Lengthen your spine, gaze forward, and breathe deeply for 5-8 breaths.
Benefits:
- Strengthens the legs and core.
- Improves posture and body awareness.
- Promotes calm and focus.
Tip: If you feel unsteady, place your feet slightly wider apart for more stability.
2. Downward-Facing Dog (Adho Mukha Svanasana)
Overview: This iconic pose stretches the entire body and is a staple in many yoga sequences. It’s a beginner-friendly pose that builds strength and flexibility.
How to Do It:
- Start on all fours, with your hands under your shoulders and knees under your hips.
- Tuck your toes, lift your hips up and back, forming an inverted “V” shape.
- Spread your fingers wide, press into your palms, and keep your heels reaching toward the floor (they don’t need to touch).
- Hold for 5-8 breaths, keeping your head relaxed between your arms.
Benefits:
- Stretches the hamstrings, calves, and back.
- Strengthens the arms and shoulders.
- Relieves tension in the spine.
Tip: Bend your knees slightly if your hamstrings feel tight to maintain a straight back.
3. Child’s Pose (Balasana)
Overview: Child’s Pose is a restorative pose that promotes relaxation and is perfect for beginners to rest during practice.
How to Do It:
- Kneel on the floor, bringing your big toes together and sitting back on your heels.
- Spread your knees apart (as wide as feels comfortable) and lower your chest toward the floor.
- Extend your arms forward or rest them alongside your body.
- Rest your forehead on the ground and breathe deeply for 8-10 breaths.
Benefits:
- Stretches the hips, thighs, and ankles.
- Calms the mind and reduces stress.
- Relieves lower back tension.
Tip: Place a folded blanket under your knees or forehead for extra comfort.
4. Cat-Cow Pose (Marjaryasana-Bitilasana)
Overview: This gentle flow between two poses warms up the spine and is excellent for beginners to improve flexibility and coordination.
How to Do It:
- Start on all fours, with your wrists under your shoulders and knees under your hips.
- For Cat Pose: Exhale, round your back, tuck your chin, and draw your belly toward your spine.
- For Cow Pose: Inhale, arch your back, lift your chest, and look forward.
- Flow between the two poses for 6-8 rounds, moving with your breath.
Benefits:
- Increases spinal mobility.
- Stretches the back, neck, and chest.
- Improves coordination and breath awareness.
Tip: Move slowly and avoid forcing the arch or curve of your spine.
5. Corpse Pose (Savasana)
Overview: Savasana is a relaxing pose to end your practice, allowing your body to integrate the benefits of yoga.
How to Do It:
- Lie flat on your back with your legs extended and arms resting by your sides, palms facing up.
- Allow your feet to fall naturally outward and close your eyes.
- Breathe naturally and relax for 3-5 minutes, focusing on your breath.
Benefits:
- Promotes deep relaxation and stress relief.
- Helps lower blood pressure and calm the nervous system.
- Encourages mindfulness.
Tip: If your lower back feels strained, place a folded blanket under your knees.
Tips for Practicing Yoga at Home
- Start Slow: Begin with 10-15 minute sessions, focusing on simple yoga poses like the ones above. Gradually increase the duration as you gain confidence.
- Use Props: A yoga mat, blocks, or a strap can make poses more accessible and comfortable.
- Breathe Deeply: Yoga is about connecting breath with movement. Inhale to expand, exhale to release.
- Listen to Your Body: Never push into pain. Modify poses as needed to suit your comfort level.
- Stay Consistent: Practice 2-3 times a week to build strength, flexibility, and familiarity with yoga poses for beginners.
Creating a Beginner-Friendly Yoga Routine
Here’s a sample 15-minute beginners yoga poses for beginners at home sequence:
- Mountain Pose (2 minutes): Ground yourself and set an intention.
- Cat-Cow Pose (2 minutes): Warm up your spine.
- Downward-Facing Dog (2 minutes): Stretch and strengthen.
- Child’s Pose (3 minutes): Rest and relax.
- Corpse Pose (6 minutes): End with deep relaxation.
Final Thoughts
Starting a yoga practice at home is an empowering way to prioritize your physical and mental well-being. By focusing on simple yoga poses like Mountain Pose, Downward-Facing Dog, Child’s Pose, Cat-Cow, and Corpse Pose, beginners can build a strong foundation without feeling overwhelmed. With consistency and patience, yoga will become a rewarding part of your daily routine.
So, roll out your mat, take a deep breath, and begin your journey with these yoga poses for beginners. Namaste!